In this view from Warsaw’s Palace of Culture and Science, a glass tower fills much of the frame. Look at the windows on its shaded side in the starting image, then at the bright clouds. How can you lift the façade while keeping detail in the sky? The settings below come from the saved edit of this particular DNG.
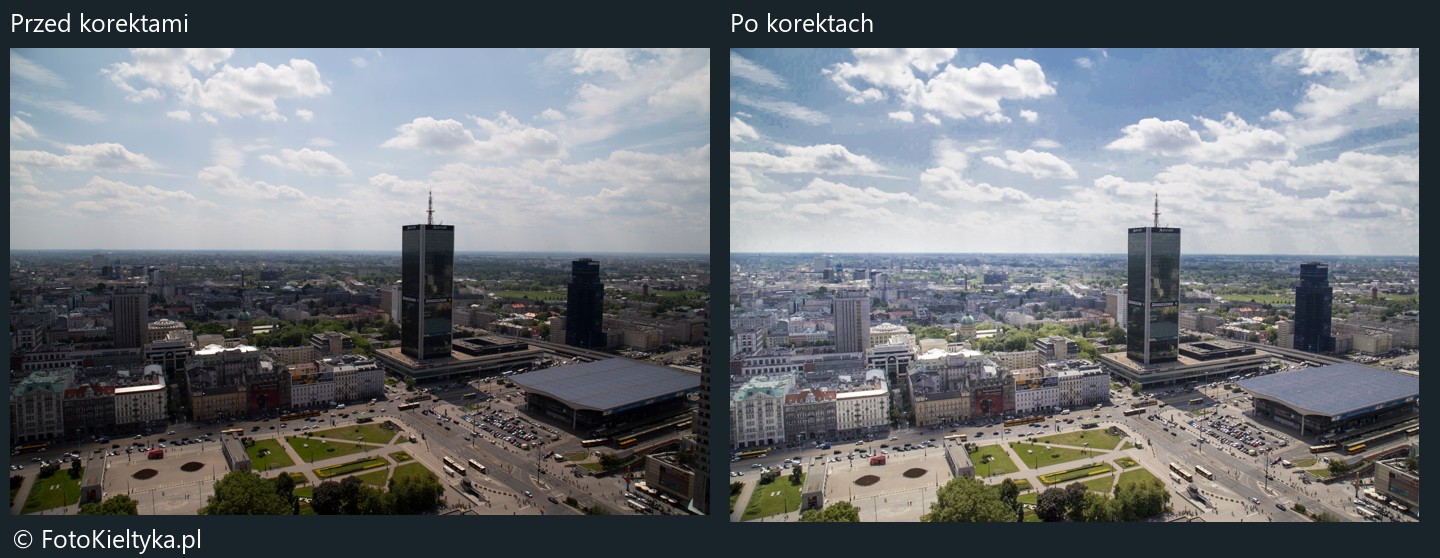
Open the photograph in Develop against a neutral background and fit it to the window. The bright cloud, dark windows and long edge of the tower are useful reference points. Save the starting state as a snapshot or make a virtual copy so you can compare the whole image after several adjustments.
Check the camera profile and lens correction. This version used Adobe Standard with lens profile corrections switched off. On your own frame compare both settings, watching straight lines and corner brightness. Converging verticals need a separate adjustment; see how to photograph architecture.
Exposure was set to +0.90 EV. Compare the bottom of the previews: the smaller buildings also benefit from the lift. Now look up. Highlights was set to −34 and Shadows to +34. The first adjustment tames the brightest tones; the second reveals the divisions between windows on the shaded façade.
Whites stayed at 0, Blacks was set to −18 and Contrast to −6. Deepening the blacks after lifting the shadows preserves the dark accents between windows. On another photograph, stop when details become legible while the shaded wall still looks shaded.
Both versions retain the camera’s white balance of 5800 K and Tint +18. The colour mixer accounts for part of the difference in the sky: Blue Luminance is −72. Lowering it also darkens blue reflections in the glass. Watch the sky and windows together. If cloud edges develop dark rims or the blue looks uneven, ease off.
The saved edit has two active brush masks that lighten selected areas. For your own adjustment turn on the mask overlay and work across part of the façade with a soft brush. Switch off the overlay to judge brightness. Magnify the roof against the sky: a pale halo suggests the stroke crossed the edge or the adjustment is too strong.
Sharpening Amount is 25, Radius 1.0 and Detail 25. Colour Noise Reduction is 25. Magnify the boundary between two panes, then move to an even patch of sky. The first shows edge definition; the second reveals amplified grain. Increase luminance noise reduction only as needed. Excessive smoothing can erase fine divisions in distant windows.

For FotoKieltyka.pl, choose JPEG and sRGB in Export. For an image inside an article, 2000 px on the long edge is a useful starting point. Apply the FotoKieltyka.pl watermark and open the exported JPEG to check it against the actual background. Inspect fine lines after resizing, especially if you use output sharpening for screen.
For stock, export a separate full-resolution sRGB JPEG after cropping, without a watermark. Inspect the sky, corners and building edges at high magnification. Give the two export presets distinct names so the small web version never goes into the stock submission.
Explore the complete Warsaw album or see photographs available to license in the FotoKieltyka.pl Adobe Stock portfolio.